Monday, June 30, 2008

How to make SL clothes in the Gimp (part 2)

In part one we got ready to make Second Life clothes in the Gimp. Now we'll make a simple coloured shirt: our first item of actual SL clothing. You make Second Life skins using the same techniques: you just paint skin colours instead of clothing colours.


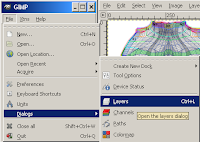
If your Layers dialog is missing, re-create it with Dialog->Layers from your Tutorial Shirt window, or File->Dialogs->Layers from the main Gimp window. You will need it for this lesson.
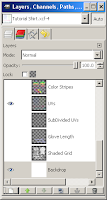


Open your Blended Upper Body Template.xcf file - or whatever you chose to call it. Over time, you'll probably add layers to it. Save it as Tutorial Shirt.xcf. (At least, that's what I'll call mine. You can call yours whatever you want to.)


There's an awful lot of information in the Blended Templates (now Tutorial Shirt) file. Let's turn some of it off - it's too much to deal with at this stage. Go to your Layers dialog.

Click on the eye symbol for each layer, and watch the Tutorial Shirt window. You'll see how each eye symbol you turn off makes something vanish from the Tutorial Shirt window.
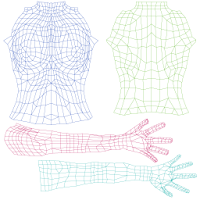


Clothing and skin designers make a lot of use of this selective visibility of layers. For now, turn off everything except 'UVs' and 'Backdrop'. What's left should look like the image to the left.


Our goal is to make a new layer, and on that layer, cover each of the UV grids with our favourite colour. Then we'll turn off every other layer, and save only our coloured layer as the 'texture' for our shirt. We'll also give the shirt a nice neckline, and sleeves only partway down the arm.
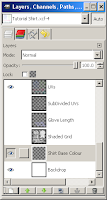


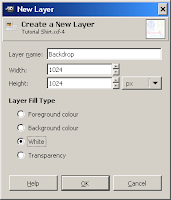
So let's start by making a new layer. We've done that already, to make the backdrop. This time, we don't want a white background to the layer, we want it transparent. And we want a different name. So back to our friendly little page icon we go. I'm calling my layer 'Shirt Base Colour'. Click the 'Transparency' option under 'Layer Fill Type'. Leave the 1024 * 1024 layer size.


Move this layer so that it's under the UVs and above the background. Make sure this layer is selected: as in, the blue bar (when the layer window is selected) or gray bar (when its not) is on the Shirt Base Colour layer.
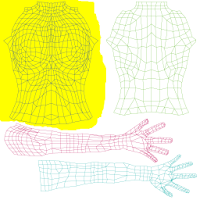


Use a selection tool (I used free select) and circle the entire blue UV layer. Go to the Colours (or Colors) dialog, and pick a colour you like. Or for this tutorial, use bright yellow because it shows up with each UV grid colour. Fill the selection with the bucket fill tool.


If your Colors dialog is missing, go to File->Dialogs->Colors, like we did with the layers.


Now to make the neckline for the front. Zoom in. View->Zoom->200%. (Why 200%? Because it lets the whole neckline show on my monitor. If your monitor shows the whole neckline at a different setting, feel free to use it.)


As the clearly visible bust shows, the blue UV grid on the left is the front of the body, so get the neckline of the blue UV grid into the middle of the window.


We could use any selection tool to get the yellow off our neck. We could even use the eraser. But I'll show you a very handy tool called the Paths tool. I've circled it in red for you.
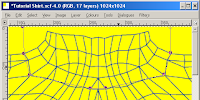


Select the path tool, then click around the neck where you think it would look good. I find that using the intersections of UV lines works very well: these are points which don't change much over different avatar shapes. Make your first and last clicks up near the top of the screen, rather like I did.


Only experience (and lots of tries on your previewer) will let you decide which particular intersections of UV lines will have which effects - and when to ignore the UV lines and just place a feature precisely where you want it.


If you make a mistake with the placements, you can drag the little circles around. You might find as you do that that two little squares appear out of one (or more) of the circles. That's another nifty feature of paths - those squares let you make curves, rather than straight lines. You can get those squares out of any of the circles: select a circle by clicking on it, hold the control key down, then click in the circle and pull. You'll get two little squares (called 'handles').
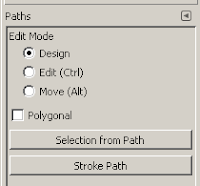


Play with the path tool until you have a nice neckline. (You may need to switch between 'design' and 'edit' in the tools menu; design lets you drag circles around, edit seems to control the handles.)

Select the last circle, up at the top of the screen, then click on 'Selection from Path' in the tools menu at the bottom of the Gimp main menu. This makes the whole area above the neckline selected, and you can just cut it away (Edit->Cut or control-C).


If the Paths toolkit (which includes Selection from Path) isn't there, use File->Dialogs->Tool Options to re-create it.


Repeat the whole process for the back of the shirt, and colour both sides of the arm. Unfortunately, this is one arm - there's no opportunity for asymetrical sleeves in texture clothing in Second Life. This arm represents both of them.
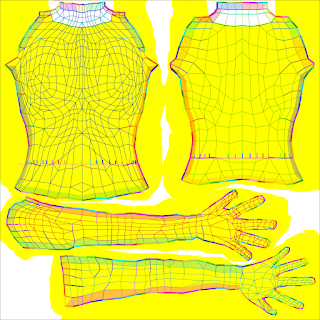


Now we come to one of the big not-a-secrets of clothing design in Second Life. How do we match the front and back necklines?


Our front neckline crossed the shoulder seam at the second UV intersection from the shoulder, so our back neckline should cross at the same place. Another option is the match lines and seam edging lines that Robin and Chris have so generously given us.


The image is of the shirt at this stage, with both Robin and Chris' matching tools showing.


We're going to use match lines to help us with the sleeve, too. 'Edge Matching Guide' from Chris Midnight's templates is my favourite for this task. Robin's tool is 'Match Lines'. Make one or both of them visible by clicking the eye column in the Layers dialog.
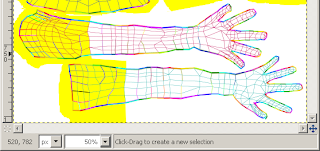


Make sure you still have your 'Shirt Base Colour' layer selected. Decide how long you want the sleeve to be. Find one of Robin's match lines or the end of one of Chris' match colours that's about at that point, on each side of the top arm. Use a selection tool (paths are good) and get rid of all the yellow from those points to the end of the arm on that arm.
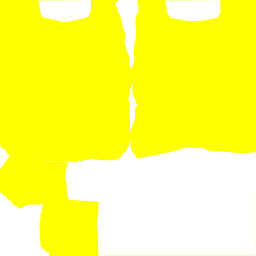


The two sides of the arm that are closest to each other are matches, and the two sides that are furthest from each other are matches. Find the corresponding match lines/end of a match colour on each side of the bottom arm. Use a selection tool and get rid of the yellow below those points on the bottom arm too.


Turn off every layer except your colour layer. Even the backdrop. Save your file as a .jpg and upload it to the UVMapper. (See part one if you've forgotten how to do that.)


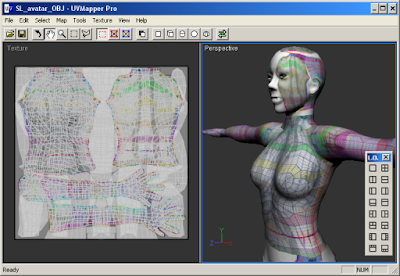
Your tutorial shirt should look something like this. Use the zoom, hand and rotate tools (under Select->Mode) to make sure all your edges match. If they don't, go back to the Gimp and add a couple of pixels to the shorter surface, or remove a couple from the longer.


On the arms, it can be annoyingly difficult to be sure which arm edge corresponds to the edge on the tshirt. I put a coloured dot on the part I want to check, re-upload and look for the dot.

Repeat the process of tweaking the pixels until all the edges match to your satisfaction, then fill any coloured dots in with the proper colour.

If you want to use my advanced tutorial on using textures, this is the stage at which you put the texture in.


Now - finally - it's time to take it into Second Life. But let's not be hasty, we'll take it to the beta grid. First, we should save it in something better than a jpg.


Save your shirt. Save a backup, just in case.


Once it's been saved at full size, use Image->Scale, and scale it down to 512 by 512. The Second Life viewer will do this anyway, and Gimp is better at scaling than the viewer is. Also, 1024 * 1024 is four times larger than 512 * 512: since that extra size won't ever be seen, use the smaller one.
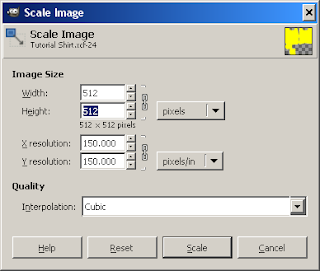


Then File->Save a copy, and save it as a Targa, or a .tga. Untick 'RLE compression' and 'Origin at bottom left' - we don't need either of these.


Another option is to save as a .png. PNGs are smaller than Targas, but some people have problems getting transparency with them. Most of the options don't matter much, but be careful with 'Save background color'. If you want a transparent background (to show skin above the neckline and below the sleeve hems), make sure this is NOT ticked. For anything where you don't want transparency, make sure it IS ticked.


Edit->Undo the scaling once you've saved the copy, so you don't forget and save it at its scaled-down size. If you do mess up, just undo back until it's 1024 again and save at the larger size. Undo is better than scaling it back up, because each scaling is slightly lossy. With the simple outfit we have this time, it doesn't matter much, but a fancy outfit could lose a lot of detail.


(If you can't undo back till its 1024 again - well, that's why you saved a backup before you scaled it, right?)
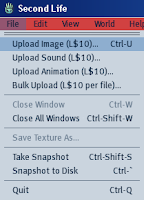


Now go into the Second Life beta, and upload the .tga or .png. Make sure it's the beta grid - don't upload it to the main grid (and cost yourself 10 Lindens) until you've checked it in the beta grid.
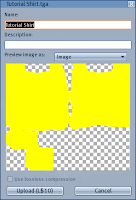


Upload with the File->Upload Image dialog. It will show you a preview of the image, and warn you that uploading will cost 10 Linden. Don't worry about that: the beta grid linden are almost infinite. (But nothing on the beta grid can be trusted to last, which is why they're effectively infinite.) The preview will have a checkerboard background if it's transparent. Accept the upload.


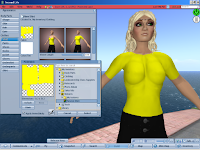
On the beta grid, you will probably be in a public place. If you're female, make sure you're wearing some sort of undershirt: even if it's just one you make with the sliders. Like the one I'm wearing in this picture.
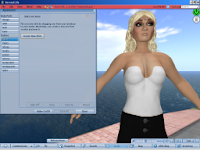


Go into appearance mode. Select shirt. Use 'Take off' down at the bottom of the appearance mode dialog to remove any shirt you're currently wearing. (Thus, the undershirt.) Press 'Create new shirt'.

There are two squares. The top one is called Fabric. Press that one, and in the texture dialog which it summons, find the shirt. Save it as whatever you want to - Tutorial shirt will do - and you're done!

You can move the sliders around and see what effect that has on your shirt, and you can choose different colours in the colour window too, just to explore your options.


When you're selling, this is a good time to set permissions on your new piece of clothing. It's a good habit to get into now, so go into the inventory, find your shirt (probably at the bottom of your clothing folder), and right click on it. Select properties, and then down at the bottom, make sure the permissions you want are the ones that are ticked. Don't have both 'copy' and 'transfer' ticked unless you want it to be a freebie.


This is where I say 'the rest is art'.
Move on to part 3, Highlights and Shadows.

How to make SL clothes in the Gimp

Apparently, there are few good tutorials about making Second Life clothing & skins in the Gimp. Or so I'm told. Well, I use the Gimp, so I may as well explain.

Theory

Second Life clothing comes in two types. One type is prim attachments to the avatar, and that's not what we're working with in this tutorial. Those are made within SL, using prim building techniques.

The other type is painted onto a flat picture,then wrapped around the avatar. This is used both to make clothing and to make skins, and the techniques in this tutorial series will work for both.

As you can imagine, wrapping a flat picture around a bumpy avatar means you get some odd distortions to the flat picture. You also need to know which parts of the picture end up on which parts of the avatar.

Linden Lab made a set of reference images available. If you put the reference image underneath your painted clothing, you can see where on the avatar your painted clothing will end up. Chip Midnight and Robin Wood practiced and painted and studied the avatars, and made extra reference images available (thank you, Chip and Robin!), and I'm going to recommend that you use both of those.

I have created a post with a fuller explanation of the theory behind Second Life clothing.

Setting up
I recommend that you read Olila Oh's information on setting up as well as this tutorial - we say things in different ways. However, either tutorial will leave you in the same position: ready to make SL clothing or skins, and with a complete toolkit in your hands.

1. Download Robin Wood's and Chip Midnight's templates. Make sure you get the 1024 * 1024 layered versions. Yes, they're called photoshop files, but the Gimp can read them. You must get the .psd files, not .jpg!
These are our reference images. We use them to tell us where in our painted clothing to put a collar, or a button, or a seam.

To get Chip Midnight's templates from the above link, you will probably need to log in to the Second Life website. However, you can also try
Mirror 1
Mirror 2
or
Mirror 3


2. Blend the two together.
We're doing this so we can take advantage of both Chip's and Robin's work, rather than limiting ourselves to one or the other.

-- Open one (either one)
-- Save as Blended [body section] Template.xcf (for example, Blended Upper Body Template.xcf)
-- Open the other (if you started with Robin's upper body templates, open Chip's upper body templates)
-- For each layer of the second one:
**** Select all
**** copy the layer
**** paste into the first
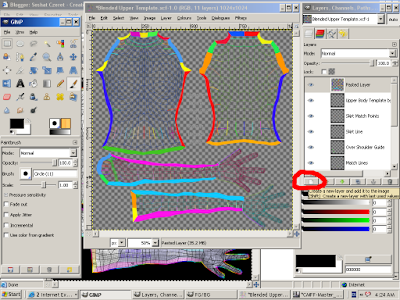
**** press the little 'page' icon on the bottom left of the layers dialog, that makes the pasted layer a new layer. I've circled the icon in red.
**** name the new layer (use the name it had in its original file).


If you can't find your Layers dialog, re-create it from the main Gimp window. File->Dialogs->Layers. See the image to the left.


3. Press the little 'page' icon again to make a new layer. Call it 'Backdrop', and designate it as white. Then use the up and down arrows beside the page icon to move it to the very bottom of the layers list.
This will help you see the other layers more easily. There's no magic or anything, it's just to make things easier to see.

4. Get a previewer.
A previewer is just a program that will make an avatar shape for you, and wrap your painted clothing around it. It just lets you see what you're doing.

Olila suggests the UVMapper demo and the Second Life avatar mesh files (the .obj ones). I explain how to use this later in this tutorial.

Johan Durant wrote a previewer that can be found at the Second Life Texturing Forum. I haven't used it myself, but there's explanations of how to use it in the forum thread.
While you're there, bookmark the forum. Come back and read it regularly.

Another previewer is AvPainter, which is costly in Lindenbucks, but has a free demo version. Get both versions at the Avpainter page on SLExchange. The demo link is in the description, about halfway down. Again, I haven't used this, but I understand that instructions come with it.

You can also use the SL Beta grid, which is a test version of the SL grid. Go to the wiki page talking about connecting to the preview grid.
A useful site with answers about the Preview Grid is The Second Life wiki.
When you upload on the beta grid, it will claim it's charging you Lindenbucks, but it's charging you beta grid dollars and not money from your actual SL account. Beta grid dollars get renewed periodically; and stuff in your beta grid inventory WILL vanish every so often - it's a test platform and nothing is stable. But it works great for testing your uploaded creations for free.

A final alternative is to use one of the third party viewers which allows you to upload temporary textures. The temp textures don't cost any lindens - but they also vanish the moment the viewer is closed.
Imprudence is one such viewer.

Try a selection of previewers, see which you prefer.

5. Do a test 'garment'. Open a blended template, save it as a jpg (for UVMapper), then open your previewer.

Study your text garment. Compare the blended template in the Gimp to its counterpart wrapped around the 3D model. Get to know it, figure out which part is the neckline, which the wrist, which the hand. At least a little bit!

Practice will improve this, of course.

5a. Previewing with UVMapper.

I use UVMapper. To get my model, I open UVMapper, File->Open model, and browse to where I downloaded SL_Avatar_OBJ.

To use UVMapper, you MUST have Second Life avatar mesh files (the .obj ones).

Because I can't save in the demo version, I have to 'smooth' it every time: just go to the View menu, select 'Smooth', and accept the default settings.
With your model set up, it's time to load the saved template. In UVMapper, go to the Texture menu and select 'Load'.

You should get something like the picture to the right.


Okay, I cheated a little bit. Look under Select->Mode and you find zoom, hand, and rotate tools. I used those to drag the model to where I could show you a better view. In checking clothes, you'll use those tools a lot!

Ignore the fact that the head has a shirt template all over it. The legs do too. UVMapper isn't very smart about that sort of thing.

6. Use the SL Beta grid, which is a test version of the SL grid. Go to the wiki page talking about connecting to the preview grid.
A useful site with answers about the Preview Grid is The Second Life wiki.

You can do all your test uploading to there and save yourself many, many Lindens. Be aware that nothing uploaded to the beta grid gets copied to the main grid: you'll still need to upload your final versions. But by making a habit of uploading your 'final' versions to the beta grid first, you'll discover most of your mistakes before spending any Linden on uploading to the main grid.

Your preparations are all done! Move on to part two.

Sunday, June 29, 2008

GNUCash

Well, all my Seshat Studios records are duly included in GNUCash now.


Spark of Genius has cost me nothing (Thank you!) and I've sold 650 Linden worth of stuff there.
Carmarthenshire Market has cost me 1,680 Linden and I've sold 2,050 Linden worth of stuff.
Gianfar has cost me 320 Linden and I've gained 750 Linden.
Medieval Times Market has cost 200 Linden and gained 250 Linden.
In sales direct from my inventory, I've gained 1,730 Linden.

All told, including fixing errors, I've spend 3,900 Linden on uploads.

I've sold 3 Brigid items, 11 Curtseys, 8 Florence items, 5 Rowans, and a custom animation/script set.

Now I can get back to the fun part.

Saturday, June 28, 2008

Administration


I've been doing administrative work, for the last few days. Setting up an OnRez and an SLExchange shop, setting up a GNUCash financial management system, and generally dealing with the annoying parts of running some sort of business.

In SL, I've been meeting people, exploring, and mostly socialising. I've also created a roleplay character.


Amidst all that, I set up two more shops. So now I have shops at:
Spark of Genius
Carmarthenshire Market
Gianfar
Medieval Times Market

Friday, June 20, 2008

Eloh Eliot is generous


Eloh Eliot is an extremely generous woman. She has not only made quality free skins, she has provided the original PSDs for them.

Find Eloh's free skin PSDs here.

I haven't yet studied the files - I only got the link and sample skins today - but the skins I tried on my av look good.

The power supply arrived

. . . and since then I've kept busy. I made a red iris-ed eye, because I'd had inspiration to. And I researched vendors, chose SVN, and installed five SVN vendors. And finished the display images for the Rowan set (the laced leather). And totally neglected the blog.


Oh, and I won a 'Newbie show and tell' for my red iris-ed eyes!

Sunday, June 15, 2008

How annoying


It's Monday, and my new power supply is, according to tracking data, "being packed". This is annoying. Oh well.

I'm using the time productively. Some housework, some art practice, some planning for new outfits. I'm also working on the class I mentioned last post, and on the scripts that I'm writing and planning to sell.

Friday, June 13, 2008

I'm the old lady!


I've been kept away from Second Life by my computer's power supply. Damn thing decided to go bust on me, and my replacement supply didn't arrive today. So - hopefully Monday. In the meantime, I'm doing some of my RL chores, a bit of scripting, and writing a lesson I think I'll see if I can teach through NCI.

So. For the title of this: my family (me, Tat, Feldie) were out at the local shopping mall. We had coffee and a bite to eat at the food court; my scooter parked beside us. This little kid stopped as his family was walking past, and asked "Where's the old lady who rides this?"

Tat and Feldie cracked up - discreetly - when I said "I'm the old lady."

Today, Feldie and I went to an exhibition of illuminated manuscripts. Those things are even more fantastic and fascinating seen 'in person' than in photographs or anything. They're amazing!

Wednesday, June 11, 2008

Laced-up leather outfits

I was going to work on scripts, but I found myself in a mood to draw instead. So I made the ranger-ish outfits I'd been wanting. A friend of mine in Gianfar (a Pern sim) says they're also very Pernese. So I started by making leather, in the Gimp.

Making leather, I open up the Gimp, then a copy of the templates I use (a blend of Chip Midnight's and Robin (Sojourner) Wood's), and make a new layer.

On that new layer, I generate clouds and desaturate them so they are shades of grey. This will be the lighter and darker patches in the leather. Next, I do some texture edge matching.


Why match the texture edges? So the clothes look right across the mesh seams. If you look at the clothing UV maps, you'll see that the avatar bodies have separate front and back pieces. In the process of making the body (or the clothing over that body) SL puts the pieces together. If you leave the texture edges unmatched, you'll have a very distinct and obvious line where the front and back pieces meet. Try it by saving your clouds as a jpg and loading them into UVMapper. (I mentioned UVMapper in making the Brigid set.)

This part is annoying and tricky. I pull the UV maps up to above the leather, but keep the leather as the layer I'm working on. Then, section by section, I compare the front mesh to the back, and recolour the edge of the back to match the edge colour of the front.

It doesn't matter how you do it: using the dropper and the pencil, paintbrush or spray-painter; using cut and pastes; anything that works for you. Just be sure to recolour beyond the edge of the UV map, because sometimes that extra bit of texture does get used.

Once you have the edges recoloured, your work is pretty obvious: there are these huge stripes that don't blend in. Instead of having ugly mesh-seams on your lovely garment, you'll have ugly stripe-edges. So grab your favourite blending tool - the smudger, the blur, even the dodge-and-burn. Maybe the spray paint and the dropper. Whatever you like to use. And blend those ugly stripes in.

Make sure you blend the edges of the stripes, not the middle. You need to keep the centre section matched with its opposing edge, or the whole point is lost.


And finally, the texture edge matching is done! Whoohoo! Now it's time to turn those clouds into leather. Leather isn't smooth, so we want to mess up those neat, smooth clouds. Add noise.

It doesn't matter which noise, just go to Filters->Noise and play with the different types of noise (you have an undo button) and see what looks interesting to you. If your noise adds coloured dots all over your lovely clouds, there's a fix for that. Colors->Desaturate. Brings it all back to black and white.

But those noise dots are too obvious. So back to Filters, and choose one of the lovely blur options. Repeat noise and blur until you're happy with how it looks, and think it looks kind of leather-y (but too grey).


So now we need to un-grey it. I use Colors->Color Balance and play with the sliders, but you can use any of the color-changing tools. Tint it whatever shade suits you: once again, this is art. Your personal choices are up to you.

And badda-bim, badda-boom, you have leather!


Once I had my leather, I decided where to put sewing seams for the leather, and put those in. Yes, I could have left 'sewn' bits un-matched. I chose not to, some people will choose to.

Then I picked the neckline for the top. I copied the leather in the shirts file to a new transparent layer and cut out the section for the neckline.

I re-used my grommets from the Brigid set for this set, and put them and some lacing at the 'fly' area of the pants, and down the front of the top. I painted in a 'gap' between the lacing, as well. I didn't want to leave it transparent, but it needed to have some sort of 'gap' there for the visual effect.

Then I made new layers and put lacing and grommets and a gap down for gloves and boots. I had the lacing, I had the seam-matched textures - I might as well. I had to re-seam-match the very hems of the pants, though, because I hadn't done a 'hem to shoe' texture match.

The boots were a nightmare! I wanted to have properly dark heels for the boots, but SL stretches the back of the foot down to make the heel. So I ended up deciding on the settings for the shoe sliders, and repeatedly uploading attempts at colouring the boot heel to the beta grid. I eventually had to get everything exactly right down to individual pixels, to avoid having great stretched 'boot' or 'heel' colours in the wrong part of the boot.


And then there's the top of the boots and the top of the gloves. Turns out that if you rely on the sliders to define the top of your boots or gloves, you get ugly mismatches. So I once again copied my leather to transparent layers, and cut out the tops of boots and gloves.

The other touch I've done for these outfits is an edge. Just a light semi-opaque dark brushing along all the edges: top of boots, top of gloves, the hems, and the top of the collar.

Sunday, June 8, 2008

Scripts in CVS

What many of you probably don't know is that I'm a trained programmer. And one of the things you learn in your training is version control. What the hell is version control, I hear you ask? Okay, I don't hear you ask, but I bet a lot of you are wondering.


When you're writing anything important, you go through a bunch of tries. Programming - or scripting - is no different. Version control is getting the computer to keep track of your attempts, so that if you want to go back to an old version, you can.

Anyway, today I put all my scripts into CVS, which is a version control system. You can learn more about CVS CVS at GNU, or at the page for O'Reilly's book on CVS.

It's just an important little trick I use to keep things going smoothly for me.

Curtseys in store

The curtseys are in store now.

There are three curtseys. The first is an informal one which is a simple bob down and up, with the head slightly lowered. It's the sort of curtsey you see in period dramas where a maid is responding to the housekeeper or the lady of the house.

The semi-formal curtsey is similar to the informal one, but the curtsey is held for a short time at the lowest point of the movement. This would be useful as a modern curtsey or a child's curtsey. In fantasy or medieval settings, this would be the curtsey between two people of near or equal rank; or the curtsey a maid might use if her employer is of high rank.


The third is a very formal curtsey, with the torso bent very low, the back knee almost touching the ground, the arms (and theoretical skirt) spread quite wide. The curtsey is held for twice as long as for the semi-formal curtsey. If you're looking for the curtsey to give to royalty, try this one.

There's a demo set available in a sign next to the curtsey vendor. The demo set is free, but is a no-modify gesture which announces the fact that it's a demo. Try each of the curtseys out, alt-mouse your camera around to see it from all angles, and if you like them, buy one. (Or all of them! The set is cheaper than the individual curtseys.)

The curtseys are sold in a copyable/modifiable gesture, and as an animation. The animation can be put into your AO or used direct from your inventory, but I expect most people to use the gesture.

Because the gesture is copy/mod, you can shove a copy into a backup folder (just for security), and then modify copies to suit your own needs. You can make curtseys that automatically say "greetings, M'lady", if you want. I've included basic instructions on gesture modifying in the kit; and the Second Life Knowledge Base includes a Gesture Tutorial.

Plans, plans, plans

I need to finish the Epicurean stuff (the eating script), and make a demo script for the demo roll. All it needs is some final testing on the scripts, proper 'bread rolls', and the demo script.


I've got a ranger outfit I've dreamed up. And a variation on the Brigids. A variation on the Florences. I want to make a noble's outfit. I want to make male peasant's wear. I want to make male nobility clothing.

I want to make some modelling poses. I want to make some good modelling skins, too. Male as well as female.

I want to get hold of the scripts for the roleplay systems in SL, and make my food work with them. Also any clothing I make which looks 'armour-y'.

I want to make a better IC/OOC talker HUD for roleplay environments, and I'm planning to make that a freebie.

I want to make a really complicated vendor that has every feature I want - and probably some I haven't thought up yet.

I want to make some Victorian outfits.

I want to get myself a shop of my own. I should probably sell more stuff first! I want to do more active marketing, too.

Name change


My business is now Seshat Studios. Not just 'Seshat' or 'Seshat's shop' or whatever. An actual business name.

I've got a Second Life group by that name, too. Seshat Studios.

Modify permissions

Yet another change. I attended an NCI class on consumer skills, and the woman giving the class gave good reasons for consumers to want modify permission on their clothing. So I thought about it, and realised there is no reason not to give modify permission.

Nothing I've made, except the Lisa scarves, relies on no-modify permissions for me to sell lots of different colours; and I included the fact that the purchaser is effectively buying scarves of every colour in the pricing of the scarves.

Everything else would be ruined: the details would get tinted the new shade as well, and purple grommets would look funny. (No, not irrevocably ruined. Just change the tint back to white, and the garment is fine again.)

So I went through and set everything to modify permissions, redid the display images to reflect that, reloaded the images, and repacked the vendors again. And I sent copies of the modified clothes to everyone who'd bought them.


I did make one change: I'd been lazy making the sleeves of the Florences. Because I had decided on a sleeve length for them, I didn't bother painting the entire sleeve; just painted it long enough for the length I'd chosen.

But with the purchaser now able to modify the Florences, I needed (okay, wanted) to paint the entire sleeve. That way the purchaser can give their undershirt or jacket Florences sleeves that go partway onto the hand (as far as the slider lets them).

Friday, June 6, 2008

Logo for Carmarthen


Carmarthenshire is a medieval roleplay sim, and logos for the shop should have a medieval feel. My Egyptian logo definitely doesn't!

So I took some time today to come up with a different logo for the Carmarthen shop. My first attempt was to try to 'medieval-ise' the Egyptian Seshat image, using the Bayeux Tapestry as inspiration. It was a total washout.

My second attempt was based on illuminated manuscripts. I think it came out rather well.

Thursday, June 5, 2008

Blender eating and curtseying

I can't believe I forgot to post about this! I got the eating animation done in Blender. It really was just a matter of learning the controls.

I still can't find all of the controls I want, but I have the ones I need. The eating animation is repeated, and the Blender inbetweening does look smoother than the Qavimator version.


And now I have a re-done curtsey. The technique is the same as my explanation back in Simple animation: curtsey. But I've had a bit more practice at watching movement, and I've read more about animations. I think this one is an improvement.

I've done informal, semi-formal, and full knee-to-the-ground deep curtsey variations. Once I upload and see how they look in Second Life, I'll gesturise them and put them up for sale.

Wednesday, June 4, 2008

Making geometric lace

I want to use the butterfly lace in sale items, but I want to provide a freebie so people know the quality of my sale items.

I was going to just have one colour of the butterfly lace as the freebie, but then I realised - if I use it in flexi-prim stuff, I need to make it modifiable so people can fit it to their avatars. I could upload a coloured lace specifically for the freebie - or I could make a different, simpler lace for freebie stuff.


I decided to make a different lace. Just a simple geometric. So back to the trusty Gimp, set up a 128 by 128 image, turn the grid on. Set the brush to a square, click on pencil mode, set the background white and the paint grey so I can see the grid as well as see what I'm doing.

And then I let my imagination run wild. Made myself a nice little geometric lace to use as the freebie lace, to give people an idea of what I can do.

(The lace freebies will be available at both the Carmarthen and Spark of Genius stores, once I get them finished. Come see them!)

Tuesday, June 3, 2008

Tinting prim skirts grey

IMPORTANT NOTE: Since viewer release 1.22, clothing is no longer darker than prims. Do not tint prim clothing attachments grey anymore.


When I'd finished setting up my shop at Carmarthenshire, a friend I'd made there - and a friend of hers - came to check it out. They both adored the Florence clothing, but they wanted it in colours as well.

So I went ahead and checked colours with them (go into appearance mode, make a skirt, tint it with the colour I think they're after, exit appearance mode), and then went ahead and made the Florence base clothing.

There's one problem, however. No matter how precisely you colour match in SL, prims have a different apparent shade to meshes.

Natalia has solved this problem, and generously given her solution in the midst of a post about being Wendy Darling in SL. Still, Natalia's grey-tint solution is useful.


She suggests using 192/192/192 as the grey tint. If you're already using a colour in the prims, however, just tinting them grey doesn't work. But tinting them darker (subtract 255-192, ie 63, from each of RGB - if you can) is something worth trying.


Since I'm making red, yellow and blue Florences for these friends of mine, it's a good opportunity to tint the Florence flexi-skirts and see if subtracting 63 works. Of course, when you don't have 63 to subtract, you just need to do the best you can.

And having tried it, the result of the experiment is this: it gets you extremely close, though not precisely on the exact shade.

Another tip: duplicate things as much as possible. Rather than taking a shirt off and creating a new one, keep the existing one (that has the setting you want) on, change the texture, and save as. Much faster.

And when making sale boxes, do something similar: set up one box. Put in the contents for that box (eg, a blue Florence set), name it, take copy. Remove the variable contents (leaving in landmarks or set notecards), put in the next contents, rename the box, take copy. Repeat until you run out of contents or get incredibly bored.

Carmarthen store

I have been brave, and bold, and rented space in the Carmarthenshire fantasy-medieval roleplaying out-of-character shopping mall. You can find it with a search for Carmarthenshire, or you can click here to go to Carmarthenshire Market.


I've put all my clothing I've made so far there - since it's all appropriate - and once I've gotten the hang of Blender and made my animations for the eating/drinking script good enough to satisfy me, I'll put my bread up for sale.

Then I can just do a bit of building and texturing to make wine bottles and glasses, or fruit platters and fruit, and the like.

(The photo has been updated with the new Carmarthen logo.)

Making lace flexi-prim clothing

With my lace, I want to make lace skirts and scarves. So I started by making a plywood box.

I modified the box with an X taper, played with stretch until I had a triangular prism that was as thin front-to-back as I could get it, and a metre high. Then I turned it into a flexi, and made sure the point of the taper was the root of the flex (if you have it wrong, just reverse the X taper).


I painted my transparent lace onto the flexi, and (art!) chose a number of horizontal and vertical repeats that seemed good to me. On the advice of a friend, I took the lace off the sides of the flexi: so the image was just on the front and back. (If you take it off the back, you see nothing when you see it from that side.)

Then I played with flexi settings until I had something really floaty. Then I made it into a skirt - and it's REALLY floaty, and totally wrong for a skirt. I need to keep fiddling with flexi settings to get a good lace skirt.

However, it seemed great for a scarf. So I created a torus, and a tiny box, and two of the flexi prims, and by dint of a lot of fiddling with positioning, size, and flexi settings, have a scarf (or a belt) that I'm happy with.

The first tries would just fall straight through my body, or would fly out horizontally on the wind and never come down at all. Setting-fiddling is really important with these floaty flexis.

Making lace

I had produced a unique version of the Brigid set for an auction: the version has a butterfly embroidery on the apron, rather than the simple flowers the others have.


And since I had that embroidery hanging around, and I wanted to play with lacemaking, I cut the image and pasted it into a new Gimp window.

Then I made the image (motif) white, with a transparent background. Then I pixel-by-pixel punched holes in it where it was too solid.

Then pixel-by-pixel, I painted connecting/strengthening 'stitching' like real lace has. And painted the 'supporting gauze' that real lace has (well, real lace can be on many fabrics, but most of them are gauzey).

I copied the motif, connecting stitching, and gauze, onto a new layer and painted it grey.Then I uploaded both a white-on-transparent and a grey-on-white version.

Now I have lace.

Animating with Blender

I showed my animations to a friend of a friend, who happens to be a professional animator. She complimented me on them, and told me she was amazed that they were my first ever animations (WHOOO!)

However, she said I needed to work on my timing and smoothness, and suggested I look at the program called Blender. She also offered me an SL skeleton/armature she'd developed for Blender. Jacek's Blender code and tutorial is here.


Well, Blender turns out to be scarily complex - which it has to be, it's not just an animation program like Qavimator is. Blender is a renderer, animator, 3D modeller, and a bunch of other stuff.

So right now, I'm thrilled that I've figured out how to make the skeleton do a really clumsy, ugly walk. But eventually, I'm sure I'll get the curtsey and the eating/drinking animations done in Blender, with their timing and smoothness corrected, and get them really polished and lovely.

Spark of Genius: store

If you think any of my stuff sounds cool, I have space at some friends' shop. It's called Spark of Genius, and is easy to find with Search->Places in SL. Or you can click here to go to Spark of Genius.

My stuff has a Seshat logo on it (taken from an Egyptian image of Seshat, the Egyptian female counterpart to Thoth).


The vendor I'm using should be easy to use: my friend has been using it and makes lots of sales with it. The only problem with it is loading it - it's very picky about its configuration notecard.

Making a new vendor is on my to-do list!

If there's anything I've made that you want, that isn't in the shop, IM me in SL and we'll talk about it.

512 by 512

Second Life's rules about textures change sometimes, but at present all clothing textures get converted to 512 by 512. Since the Gimp (which I use) is better at converting textures than SL (probably) is, I get better results by doing the conversion myself.


Besides, a 512 by 512 image takes less time to download to other peoples' clients, so my clothes and stuff are 'cheaper' for the hardware.

So I spent the time, effort and energy to convert all my textures-so-far and upload them to SL, re-make the clothes, and re-load my vendors with 512 by 512 texture sale items.

Wheee.

(Note to self: Second Life now supports png. Either png or tga are the most appropriate file formats for SL, and png is slightly smaller than tga for most textures.)

Making eyes

So I'd figured out most things, and I decided I wanted to have a go at body parts. I researched skins, and decided that I already had the basic techniques for them, I just needed to get the art - and the time and patience.

Prim hair is texturing and building: again, art, time and patience.

So I decided to have a go at eyes.I found 'create new body parts' under 'create' in the inventory menu. (This is also where you create skins and new non-prim hair.)

As with clothing, I experimented with library textures and with sliders. You can get some really funky eyes that way - try it!


Then when I showed my friend my funky eyes, she asked for specific eyes from me. Grab the texture from Second Life's templates page, figure out where on the template the iris is - not that hard, they have a layer that's a guide for the iris - and once again, paint inside the lines.

Fortunately my friend's request was simple: she wanted a single-colour geometric shape, not a detailed, perfectly highlighted human-looking eye.

Be aware: eyes get rotated 90 degrees clockwise. So paint your eye, then rotate it 90 degrees counterclockwise before uploading it.

Making gestures

Gestures, it turns out, are sequences of animations, sound and chat text. Sound usually bugs me, so I typically go for silent gestures.


Gestures are created with the Create menu in the inventory. I find it fairly self-explanatory: drag the animation into the right hand side, fill out the Trigger and Replace With boxes (or leave Replace With empty, to have nothing show as chat).

To add a chat line, click on Chat in the library, click on Add, write your chat text in the box that appears in the bottom right.