A Second Life avatar is like a papier-mâché (paper mache) sculpture. It has an underlying shape, which is constructed of a lot of 'lines' and 'vertexes' and looks like a chickenwire framework. And on top of that chickenwire framework, it has several layers of colour - like layers of paper over the chickenwire.
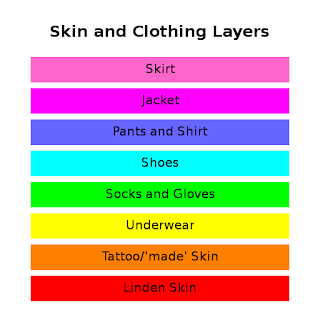
The bottommost layer, right next to the chickenwire, is what we call the 'linden' or 'base' skin. This skin is almost featureless, very few people like to have it visible. It's made inside Second Life itself, and is manipulated in Appearance Mode.
Fortunately, there is another skin layer. This layer was intended for tattoos, and is called the tattoo layer. Now, the skin-makers use it, and paint shadows, highlights, skin textures, and makeup on it. Well, actually, they make textures in the Gimp or Photoshop or some other graphics program.
This tattoo layer is actually blended into the linden skin - if you look at the 'skin' tab in appearance mode, it has three boxes called 'tattoo'. A skin-maker creates textures for the head, upper body and lower body. He uploads them to SL, then creates a new Linden skin and wears it. He goes into appearance mode, goes to the skin tab, and puts the textures in three boxes. When he saves, SL 'paints' those textures onto the Linden skin he was wearing.
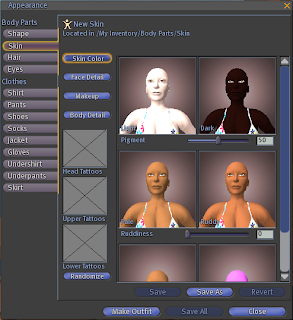
So we cover the 'chickenwire' shape with linden skin, then cover the linden skin with a painted skin. On top of that, we put layers of clothing.
You may be wondering what tattoo makers do, if the skin makers have taken over the tattoo layer. Tattoo makers use the underpants/undershirt layer. Tattoos are made with this same technique.
The lowest layer of clothing is the undershirt and underpants. These will cover the torso, arms and legs, but stop at the neck, wrist and ankles. Each garment also stops at the waist.
Slightly above those are gloves and socks, both of which will go past the joint - you can make opera length gloves, and thigh-high stockings with those layers.
Above those are shoes, which can go thigh high but are underneath the pants layer; and pants and shirts.
People who make (or wear) hipster pants have a problem: the shirt layer will never go lower than the waist. So when someone wears hipster pants and a shirt-layer shirt, there's an expanse of belly left exposed. One good solution is for shirt makers to make underpants that match the shirt, and fill in the gap. Another solution for shirt makers is to make their shirts on the jacket layer - but those must always be untucked shirts (jackets cover pants).
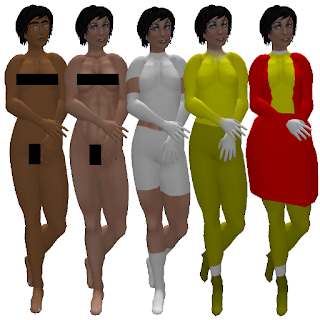
The jacket layer is above the pants and shirts layer, and extends down the thigh. Unfortunately, it follows the shape of the avatar, which leads to jackets which curve around the butt and slip into the crack. Most jacket-makers use the skirt layer, or a short 'flexi prim skirt', to solve that problem.
The last clothing layer is the skirt layer, which goes above the jacket layer, and is actually made of its own chickenwire mesh: it's not actually an inherent part of the avatar shape. This leads to another famous clothing problem: huge butts. Most people solve that by having a version of their own shape with a smaller butt.
To actually make clothing, you use the same technique as with making skins. Create an item of clothing (there's a create menu in the inventory), wear it, go into appearance mode, and use the 'fabric' square to select the texture for it.
However, of course, that presumes that you have a texture that does what you want . . .
Making the skin and clothing textures
Many of you who read this will know I already have a tutorial called "How to make SL clothes in the Gimp". That covers the techniques in much more detail than this post will: however, this post is intended to explain the background theory behind the techniques.
Those of you who don't use the Gimp: you can still read my tutorials and get a lot out of them. Or you can check Olila Oh's, Natalia Zelmanov's, or Robin (Sojourner) Wood's blogs, all of which have SL clothing tutorials for that other major graphics program. Links to those blogs are under 'Generous Residents' in the left hand column.
But back to the underlying theory of SL skin and clothing texture-making.
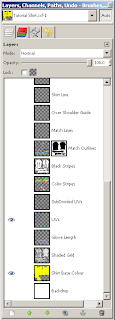
The Gimp, Photoshop, and most other modern graphics programs operate on layers. These are not the Second Life clothing layers - if I need to refer to them, I'll use the phrase "clothing layers".
Think of the layers as a set of transparent sheets of paper, placed perfectly one on top of the other. At any point, you can remove some layers, add others in. You can draw on a layer that's underneath other layers, or on top of other layers. (Okay, it's not a perfect analogy.)
The layers window of your graphics program will look something like the image to the left here. Each layer is represented by the square with the picture in it and the name beside it. Layers which are currently visible (included in the stack) have an eye beside them.
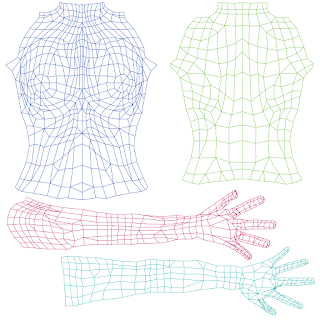
The UV maps - the templates - from Linden Lab, Robin (Sojourner) Wood or Chip Midnight are your maps to the avatar's chickenwire. You put the basic map on one of those layers - one of those transparent sheets of paper - and use it as a guide. Your actual clothing item goes on a different layer.
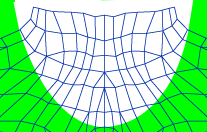
The image to the right is a layer that's been made white, and above it, the basic map layer. I find that working with a white background makes a huge difference to me - it makes it much easier to see what I'm doing.
Next, you place another layer down. Above or below the UV map, whichever works best. On this layer, paint the basic shape of the clothes you want. It doesn't matter which art tool you use - if this was physical art, you could use a pencil, oils, acrylics, wax crayons, chalky pastels, charcoal. Doesn't matter.
In digital art, use the paintbrush, pencil, airbrush, clone tool, use pathing to make a selection and fill to fill it - doesn't matter. Just put marks on the layer. Use the UV map as a paint-by-numbers guide.
Be a bit messy. Extend the colours beyond the UV map. In my experience, if you don't bleed the colours beyond the edges of the UV map, you get gaps in the avatar seams.
Note: some novice designers try to follow the contours of the UV map in everything they make: this is not necessary! The outline of the UV map is important because it tells you where the avatar body is. However, feel free to ignore the rest of the lines.
Many designers use them as a sort of 'road map' of the avatar body. They (we) decide to make a neckline which starts at this line on the shoulder, and goes down to that line in the centre front chest. Then we use the pathing tool to make a neat curve, and that curve forms the top of the neckline - even though it crosses a whole bunch of UV lines on the way.
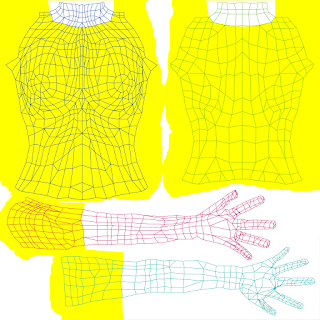
The image to the left is a white background layer, a transparent clothing layer that extends beyond the UV maps (but has neat edges at neckline and the end of the sleeves), and above both of those, the UV map layer.
At this point, it's a great idea to hide the UV map and the background layer (click on the eye to make the layer invisible). Then save just the clothes shape as a .jpg or .png and use your clothes previewer (see "How to make SL clothes in the Gimp" for a list of previewers). In the previewer, you can make sure the clothes match up neatly at the avatar seams, and that the clothes shapes - the neckline, hemline, and so forth - is what you were aiming for.
Once you have it correct, save the whole file (.xcf in the Gimp, .psd in Photoshop) so you can re-use the same clothing shape for a different product later. Many SL clothing designers have a library of these with different necklines, different sleeves, different waistlines and hemlines, just to give them a head start on making a new garment.
Once you have the clothing outline correct, you can make the background and UV map visible again, and start making details for your garment. Clothing seams, buttons, fabric textures - anything you want to.
I strongly recommend that you make each of these on a separate layer. If you have the clothing seams on one layer, and the buttons on another, you can't destroy the clothing seams while making the buttons. Also, if you have the clothing seams on a separate layer from everything else, you can just copy that layer to a new outfit to put the clothing seams - but nothing else - on it.
I use so many 'transparent sheets' I sometimes lose track of them all. I keep forgetting to name them sensibly. Learn from my mistake - name your layers! And I never merge them together permanently: they're only merged as part of the final saving process, to get the image I want to upload.

Once you have all the details you want, select the layers that should show in the final product, making only those layers visible. If any of the avatar's skin should show, make sure the background image is not visible - you'll need transparency. (On a garment that fully covers the avatar skin, you can leave the background layer in if you wish.)
Now you save the whole thing as the complete file, to keep every layer of detail available for later use. Then 'save a copy' as well - only this one you save as a .png or .tga for uploading to SL.
The Gimp or Photoshop or your graphics program will merge the layers you have selected for you, leaving you with an image like the one on the right. (Only with the grey checkerboard transparent background.) This is your final product, this is what you upload to Second Life.
And once in Second Life, you use this texture in Appearance Mode to make your shirt. All done! Yay!
For a more complete walk-through of actually doing it, rather than the theory, see my tutorials of making Second Life clothing in the Gimp.


2 comments:
Nice, thanks for sharing Seshat! You do a great job with your blog.
Do you know if this tutorial is still up-to-date with the new avatar rendering system?
AFAIK the infamous "clown skins" bug occurred because Linden Lab is changing the way avatars get rendered - in the first Release Candidate viewer that implemented this new rendering system, a new bug appeared (fixed in the current RC viewer).
Can anyone provide better information about the new rendering system and if it implies anything new to add to this tutorial? I feel there could be something new about skin layers.
I'm digging through Q Linden's office hour transcripts but I didn't find anything yet.
The one in the abortive RC 1.23.1? No, it's not current with that - I have chosen to wait and see what gets decided after that rather impressively comment-laden JIRA.
Once there's a final decision, I'll update this and the NCI Clothing Basics course (which uses the same images) accordingly.
Post a Comment