Many people in Second Life sell their products in scripted vendors. Many more seem not to know how to sell their products at all.
However, Second Life includes a very simple, straightforward way to sell products, with no scripts at all - extremely low lag and reliable. It's built in to the prim editing system.
Preparing the items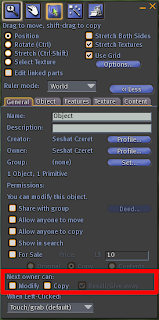
To start with, you need something to sell. Making that something is beyond the scope of this tutorial - but I have other tutorials for some of that, and you can always check out
NCI and other tutorial places inworld.
Once you have your product exactly as you want it, you should make sure its permissions are set for sale.
If your item is prim-based, set its permissions in the General tab, while it is rezzed inworld. That is more reliable for prim objects than setting permissions in the inventory.
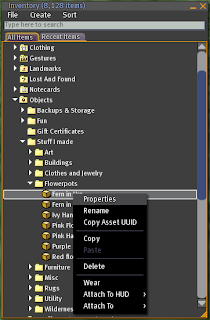
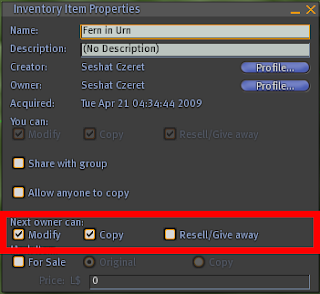
For items that aren't prims, right click on the item in inventory, and select Properties. Set its permissions in the Properties window that appears.
In all cases, we are setting 'Next Owner' permissions - the permissions that the person we give or sell the item to will have. Those permissions can never be greater than the permissions we ourselves have.
When we create an item, we have full permissions on that item. If we give or sell someone else the item with a limited permissions set, then they give it back to us, we only have those limited permissions. Or even less, if they changed the 'next owner' permissions while they had it.
Permissions are Copy, Modify and Resell/Give Away. We usually call the third one Transfer.
If you give your customers COPY permissions, they can make copies of the item, they can keep backups in their inventory while a prim item is in world, they can make multiple outfits of clothing items, or make a full set of dining chairs from one sold chair.
If you deny them copy permissions, then if they accidentally break the item somehow (retexture it, distort one of the prims, delete a script), or if Second Life loses the item from its asset server, they have no backup and the item is lost or ruined for good.
TRANSFER (Resell/Give Away) permission allows the player to pass the item to someone else. Denying players TRANSFER permission means they can't use your item as a component of some sale product, and that they can't sell it when they're sick of it.
If you give a player both COPY and TRANSFER permissions, they can give away or sell it an unlimited number of the items. It is often necessary to do this if you're selling components to other builders - such as animations used in furniture, scripts for just about anything, sculpts for furnishings, buildings or jewelry, or textures used in almost anything.
When you give out both COPY and TRANSFER items, include a no-modify notecard explaining whether the person can resell the item as is or not.
When you give out freebies, include a no-modify notecard explaining that the item is to be a freebie, and whether or not you are willing to let other people sell it as is, or modify it and sell it.
MODIFY permission allows a player to tweak and adjust the item to suit them. There is very little reason for blocking modify permission of animations, clothing or skins created with graphics templates, sounds, and sculpties - the hard work in all of those is done outside SL. Even prim items can't be trivially duplicated - it's a lot of work to reverse engineer those.
Scripts, however, can be trivially duplicated by being cut and pasted, so I would recommend blocking modify perms for those, except for freebie or teaching scripts. In those, I suggest including a comment explaining what rights you pass on.
Preparing the image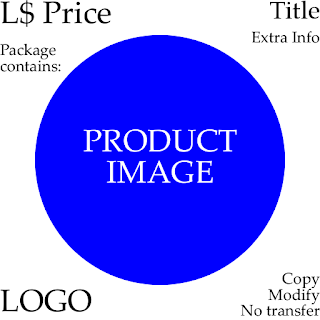
Open your art package of preference. If you don't have one, The Gimp is free and available at
http://www.gimp.org/. Tutorials are available there as well.
Create an image that answers the questions your customers are most likely to have about your product. For most products, provide an image of what it looks like, or what an avatar does when the product is working.
The price is a good thing to include (though some prefer not to, to avoid having to upload another image when the price changes). I personally think that if having the price visible sells one extra copy of the product, the upload is paid for.
Most customers like to see the permissions at a glance, and many customers want to know what they can expect to get in the product package before they buy it.
Make your image the same shape you want it to be in world. If you want a circular sign, make a circle. If you want a square sign, make a square. If you want a 4:3 ratio rectangle, make that.
Once that's done, if there's any transparency in the image, put a background colour you like behind it. (I find that it never helps to have a sign with transparency. If you disagree with me, skip the background.) Now save your sign in the native format of your art program. .psd for Photoshop users, .xcf for Gimp users.
Now resize your sign to powers of 2. Make each side 128, 256, 512 or 1024: ideally 512 or less. This will probably distort your sign - ignore that, it doesn't matter. It'll get fixed when you put it on the prim of the right shape.
If you want to test the image, making sure it looks right before you spend ten Lindens uploading it, use the SL Beta grid, which is a test version of the SL grid. Go to the wiki page talking about
connecting to the preview grid. Once there, upload the image as if you were on the main grid, and put it on the same shape prim you intend to use in the main grid.
When you upload on the beta grid, it will claim it's charging you Lindenbucks, but it's charging you beta grid dollars and not money from your actual SL account. Beta grid dollars get renewed periodically; and stuff in your beta grid inventory WILL vanish every so often - it's a test platform and nothing is stable. But it works great for testing your uploaded creations for free.
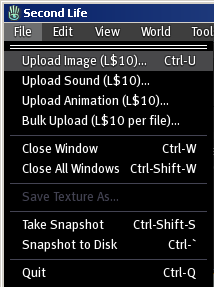
Once your lovely sale image has been created, it's time to upload it into SL. Make sure you have 10 Lindens (or more) in your account, then go up to the File menu and select Upload Image. A file browser window will open, and you can find and choose your nifty image.
Select it, and an image previewer will appear. If your file is not square, ignore how squished and ugly it looks - that's just the previewer squishing it into a square shape. Accept it, and it will be loaded into SL, into the Textures folder in your inventory. It can stay there for a while.
We'll put it on its prim of the correct shape a bit later.
Creating the box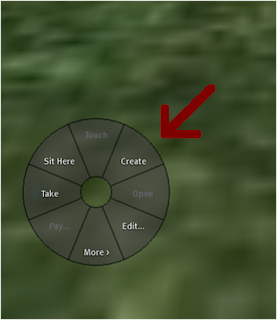
So much for preparation work. Now we can actually make our box!
Start by right clicking on the ground. If you're on a prim surface, that's okay too. Just right click on something groundlike. You should get a pie menu with Create in the top right corner. If you don't, you're probably in a place where you can't rez things, and you'll need to move to a sandbox, or to land you own.
If you're renting a shop, make sure you have the group tag associated with that shop over your name. (Right click on yourself, look for Groups, select the appropriate group, hit Activate.)
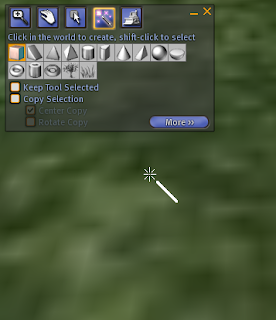
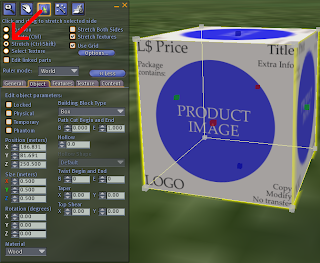
Once you have the right group activated, or are in a place you can rez, left click on Create. This will change your cursor to a magic wand symbol, and open a little window we call the Edit window. (It might be larger than the one in the image on the right - if so, that's okay.)
Look at the top of the menu in the picture. See how the box shape is highlighted? If the box shape isn't highlighted in yours, left click on the box shape, then move your cursor back to the land.
If you want one of the other shapes, that's okay too. This tutorial is based on the box, because it's easiest and this is for beginners. Just choose the other shape instead.
Now left click on the land again. This will give you a lovely plywood box.
Don't worry, we'll change the plywood part later, and we'll also change its shape so it makes your picture look right.
Packing the box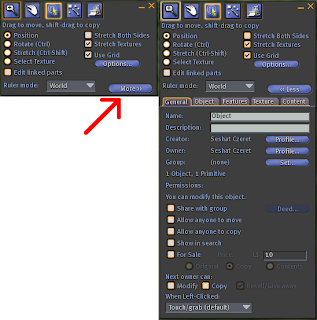
There might be a
MORE >> button in the bottom right corner of the edit window. Click that, and you'll get a rather larger edit window.
If you don't have the
MORE >> button, you already have the larger edit window. Leave it that way.
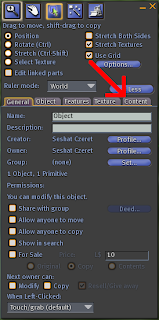
Click on the
Content tab.
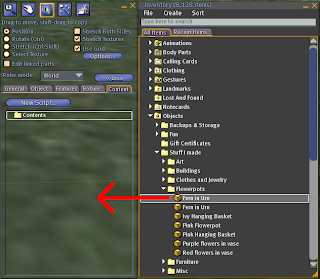
Look in your inventory for the items you want to sell. (If they're rezzed inworld and you want to package them into boxes, you'll need to take a copy into inventory.)
One you've found them in your inventory, left click and hold, then drag the mouse to the large empty window in the contents tab of your prim's edit window. Release the mouse once you're there.
If you have copy permission on the item, this will take a copy of the item and put it inside your prim.
If you do not have copy permission, this will take the copy you selected from your inventory, and put that in the prim.
Setting the box for sale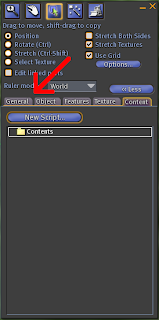
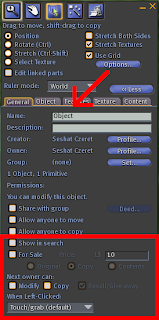
Now click on the
General tab. Fill in the name of the object in the
Name field, and a short description in the
Description field.
Then go down to the bottom of the
General tab. You will see a
Show in Search checkbox. You're planning to sell this, so you probably want to advertise it. So click that checkbox and put a checkmark in it. This box only works if you're on land that is listed in
Search->Places, but it does no harm to have it checked even if you aren't.
Beneath
Show in Search is
For Sale. Put a checkmark in that box. That will enable the text box to its right, which is the price text box. Fill that in.
Beneath the price are three options,
Original,
Copy and
Contents.
If you want the box you're packing to be sold - as in, this exact box goes to the customer, not a copy of the box - select Original. Limited edition items are often sold this way.
If you want the customer to get a copy of the box, select Copy. People who sell furnishings often sell Copy: they rez the furniture inworld, and use these settings to have the furniture literally sell copies of itself.
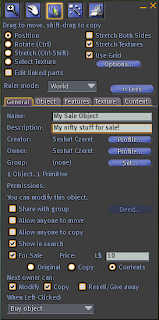
Contents is the most common setting. When a customer buys a box with the 'contents' setting, they get a folder that contains everything inside the box.
Beneath those settings are the permissions. I recommend setting them to the same permissions as the ones you set for the items themselves, back at the start. (in
Preparing the items.)
Finally, there's a dropdown menu. It controls what happens when the customer clicks on the box. I recommend setting it to
Buy object.
Technically, you could leave it at that. But a plywood box doesn't make a very good product advertisement!
Adding the image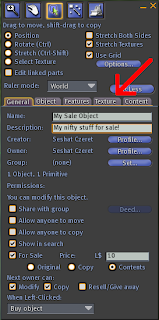
Click on the
Texture tab. Once you have, look for the box with the plywood image, and click on that. This will open a browser window for your textures.
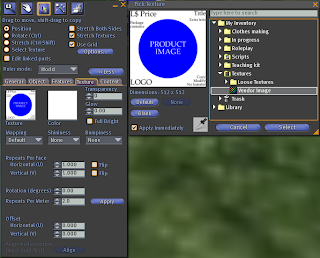
Find the texture you want on the box, and select it.
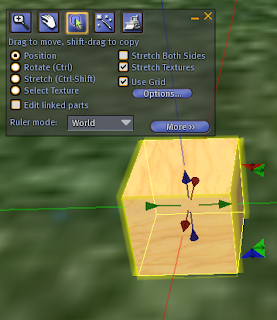
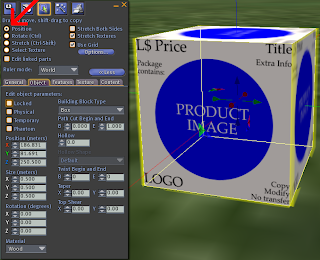
Shaping and placing the boxSelect the
Object tab. Click on the
Stretch button, and then you can see the little red, green, blue and white boxes around your box.
Click and hold on one of those boxes, then drag it towards or away from the centre of your box to shape the box.
If you prefer, you can use the X, Y and Z
Size text boxes to enter the exact size you want the box to be.

If your image doesn't stretch with the box, make sure
Stretch Texture in the top right corner of the Edit window has a checkmark in it. You can fix a texture that didn't stretch by going to the Texture tab and setting both horizontal and vertical repeats to 1.
Once your box is shaped to the same aspect ratio you made the image at, the image will look right. All the distortions we did will be undone.
Now you have a box that is shaped correctly, use rotation and position tools to place it in your shop.
The
Rotate button provides red, green and blue circles around the box, and you hold down and drag each circle to rotate the box around the centre point.
You can also fill in degrees of rotation in the Object tab, at the bottom left.
The Position button provides red, green and blue arrows, which you click and drag. The Position numbers are also editable in the Object tab.
Additional notesYou can sell your objects in 'boxes' of any shape and size. Most people who use this method use rectangular single-prim boxes because it's convenient, easy, and you can put an informative sign on it.
But don't let that stop you from selling goods in teddy bears, lollipops, or bullwhips if you prefer.


