Theory
Second Life clothing comes in two types. One type is prim attachments to the avatar, and that's not what we're working with in this tutorial. Those are made within SL, using prim building techniques.
The other type is painted onto a flat picture,then wrapped around the avatar. This is used both to make clothing and to make skins, and the techniques in this tutorial series will work for both.
As you can imagine, wrapping a flat picture around a bumpy avatar means you get some odd distortions to the flat picture. You also need to know which parts of the picture end up on which parts of the avatar.
Linden Lab made a set of reference images available. If you put the reference image underneath your painted clothing, you can see where on the avatar your painted clothing will end up. Chip Midnight and Robin Wood practiced and painted and studied the avatars, and made extra reference images available (thank you, Chip and Robin!), and I'm going to recommend that you use both of those.
I have created a post with a fuller explanation of the theory behind Second Life clothing.
Setting up
I recommend that you read Olila Oh's information on setting up as well as this tutorial - we say things in different ways. However, either tutorial will leave you in the same position: ready to make SL clothing or skins, and with a complete toolkit in your hands.
1. Download Robin Wood's and Chip Midnight's templates. Make sure you get the 1024 * 1024 layered versions. Yes, they're called photoshop files, but the Gimp can read them. You must get the .psd files, not .jpg!
These are our reference images. We use them to tell us where in our painted clothing to put a collar, or a button, or a seam.
To get Chip Midnight's templates from the above link, you will probably need to log in to the Second Life website. However, you can also try
Mirror 1
Mirror 2
or
Mirror 3

2. Blend the two together.
We're doing this so we can take advantage of both Chip's and Robin's work, rather than limiting ourselves to one or the other.
-- Open one (either one)
-- Save as Blended [body section] Template.xcf (for example, Blended Upper Body Template.xcf)
-- Open the other (if you started with Robin's upper body templates, open Chip's upper body templates)
-- For each layer of the second one:
**** Select all
**** copy the layer
**** paste into the first
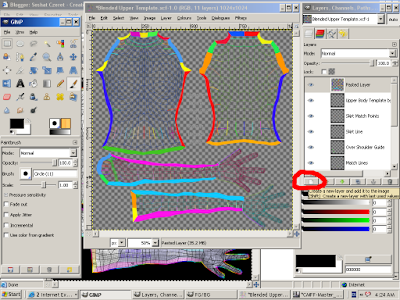
**** press the little 'page' icon on the bottom left of the layers dialog, that makes the pasted layer a new layer. I've circled the icon in red.
**** name the new layer (use the name it had in its original file).

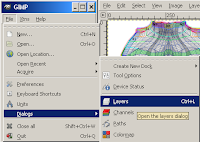
If you can't find your Layers dialog, re-create it from the main Gimp window. File->Dialogs->Layers. See the image to the left.

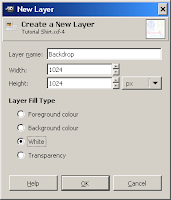
3. Press the little 'page' icon again to make a new layer. Call it 'Backdrop', and designate it as white. Then use the up and down arrows beside the page icon to move it to the very bottom of the layers list.
This will help you see the other layers more easily. There's no magic or anything, it's just to make things easier to see.
4. Get a previewer.
A previewer is just a program that will make an avatar shape for you, and wrap your painted clothing around it. It just lets you see what you're doing.
Olila suggests the UVMapper demo and the Second Life avatar mesh files (the .obj ones). I explain how to use this later in this tutorial.
Johan Durant wrote a previewer that can be found at the Second Life Texturing Forum. I haven't used it myself, but there's explanations of how to use it in the forum thread.
While you're there, bookmark the forum. Come back and read it regularly.
Another previewer is AvPainter, which is costly in Lindenbucks, but has a free demo version. Get both versions at the Avpainter page on SLExchange. The demo link is in the description, about halfway down. Again, I haven't used this, but I understand that instructions come with it.
You can also use the SL Beta grid, which is a test version of the SL grid. Go to the wiki page talking about connecting to the preview grid.
A useful site with answers about the Preview Grid is The Second Life wiki.
When you upload on the beta grid, it will claim it's charging you Lindenbucks, but it's charging you beta grid dollars and not money from your actual SL account. Beta grid dollars get renewed periodically; and stuff in your beta grid inventory WILL vanish every so often - it's a test platform and nothing is stable. But it works great for testing your uploaded creations for free.
A final alternative is to use one of the third party viewers which allows you to upload temporary textures. The temp textures don't cost any lindens - but they also vanish the moment the viewer is closed.
Imprudence is one such viewer.
Try a selection of previewers, see which you prefer.
5. Do a test 'garment'. Open a blended template, save it as a jpg (for UVMapper), then open your previewer.
Study your text garment. Compare the blended template in the Gimp to its counterpart wrapped around the 3D model. Get to know it, figure out which part is the neckline, which the wrist, which the hand. At least a little bit!
Practice will improve this, of course.
5a. Previewing with UVMapper.
I use UVMapper. To get my model, I open UVMapper, File->Open model, and browse to where I downloaded SL_Avatar_OBJ.
To use UVMapper, you MUST have Second Life avatar mesh files (the .obj ones).
Because I can't save in the demo version, I have to 'smooth' it every time: just go to the View menu, select 'Smooth', and accept the default settings.
With your model set up, it's time to load the saved template. In UVMapper, go to the Texture menu and select 'Load'.
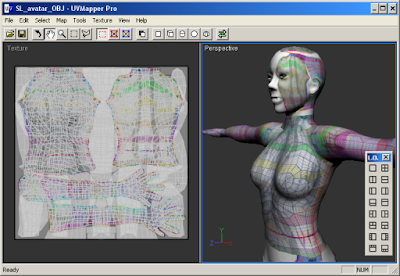
You should get something like the picture to the right.

Okay, I cheated a little bit. Look under Select->Mode and you find zoom, hand, and rotate tools. I used those to drag the model to where I could show you a better view. In checking clothes, you'll use those tools a lot!
Ignore the fact that the head has a shirt template all over it. The legs do too. UVMapper isn't very smart about that sort of thing.
6. Use the SL Beta grid, which is a test version of the SL grid. Go to the wiki page talking about connecting to the preview grid.
A useful site with answers about the Preview Grid is The Second Life wiki.
You can do all your test uploading to there and save yourself many, many Lindens. Be aware that nothing uploaded to the beta grid gets copied to the main grid: you'll still need to upload your final versions. But by making a habit of uploading your 'final' versions to the beta grid first, you'll discover most of your mistakes before spending any Linden on uploading to the main grid.
Your preparations are all done! Move on to part two.


30 comments:
For what it's worth, there is also a new library of avatar mesh files available for download.
It is the complete avatar data set including texture coordinates for all morph targets.
All expressions, body sizes, hair shapes, etc...
http://www.ccccybernetics.com/avatar_databank/
Hope this helps!
Thanks, bryan. I'm sure that will be very helpful to a lot of people.
Hello Seshat and thanks for the tutorial. I was just about to get started with your suggestion to read Olilas, but the link says the website expired on July 19, 2008. Any chance you, or someone you might know has downloadeded the tutorial or know where else I might be able to access it? Many thanks. Ginger
Ginger,
I did a Google search for anyone who might have Olila's tutorial up. I couldn't find any.
For the moment, use the Google cache: search on "tutorials/making-clothes-skins-preparations-part-1" (and part-2 and part-3), and look for the 'Cached' option.
If I can get hold of Olila in SL, I'll see if she intends to restore her tutorial. If not, I'll expand on my tutorial so its an effective replacement rather than a summary.
However, mine is a summary, so you can get the same setup done following mine as following hers.
If you have trouble with mine, let me know what you're having a problem with and I'll expand it whether or not Olila's planning to replace hers.
Olila got back to me - she's having problems with her hosting service. She intends to get her site back online as soon as possible.
In the meantime, the Google cache trick works, or you can use my tutorial.
Olila's site is back online!
Hi Seshat, thanks a lot for the great tuttorials.
Do you know where I can find a Previwer for linux? I couldn find it anywhere.
I'm not familiar with any previewers that work on Linux specifically.
However, OpenSim is definitely available for Linux, and the Second Life Preview Grid uses the same client as the main Second Life grid.
Typically, I use these in preference to other types of previewer anyway - you get a more accurate idea of what you'll get when you actually upload it.
OpenSim: http://opensimulator.org/wiki/Main_Page
SL Preview Grid: http://wiki.secondlife.com/wiki/Preview_Grid
Thanks a lot for this usefull tuto Seshat !
3 remarks :
- there is no (more) beta version of SL available, only a candidate release that charges u when importing pictures ...
- I can't find a download for Chip Midnight's templates
- UVmapper demo is not showing good the final result : no way to see fine details
Is there an other way to preview final result wihout paying the import ?
Karl Quar (Hylas Resident)
The preview grid is still there: I just checked now. See 'How do I log in to Aditi?' in the
Wiki page about the preview grid.
It does charge you beta/preview grid money, but (as I state in the main article) that doesn't come out of your real account.
Chip Midnight's templates are currently unavailable. All I can recommend is that you just use Robin's for now. (See the italicised text in 'Setting Up'.)
For seeing fine detail in UVMapper, use the 'zoom' option in 'Select->Mode'. It does have limits: some people will prefer different previewers.
Section 4 in the article covers every previewer I am currently aware of. UVMapper. John Durant's. AvPainter. The preview grid.
.. Hang on. I didn't mention OpenSim. But most people will probably find setting up an OpenSim just to use as a previewer to be a bit much.
Karl: the release candidate viewer connects to both the main grid (Agni) and the beta grid (Aditi).
You might be confusing the viewer (on your computer) with the grid (on Linden Lab's).
Whether you are charged real Lindenbucks or 'preview grid' Lindenbucks depends on the grid you're on, NOT the viewer you're using to connect to it.
Oki Seshat and thx for your replies
Anyway, i can't log on the beta grid : i'm told this account is not existing !
I seems that a special viewer is needed to enter in the beta grid now ...
I just logged into Aditi, and "Karl Quar" exists on it. It may have an older password, however.
But I didn't use a special viewer. Standard 1.23.4
Try again, with an older password. If it continues to not work, send in a trouble ticket to the Lindens. (From http://secondlife.com/support/ )
Thanks for posting about the SL Beta viewer... Being a beginner at making clothes off world... I need something like that to help with the final touches! Well done! :)
You're quite welcome.
Thanks for the link of previewers. I was starting to get fustrated because I couldn't see the whole lower body in SL previewer.
LOM Runner
This is the most confusing thing i have ever read. Nothing you said matches what is possible to do. Nothing looks the same. I cannot open the files in the UV program that you say to open... Its all a scam
I'm sorry you feel it's a scam, Anonymous. If you can tell me what you are having trouble with, please let me know.
Please be aware that the details of the Gimp user interface have changed once, possibly twice, since I wrote this: first the File menu changed from being on the Tools window to being in the image window itself.
I hear that the next change is to merge all three windows into one. I haven't seen that version of the Gimp interface yet.
If your version of the Gimp differs from mine in that way, you will find that while the tools are the same, the place to find them may be different.
Also, one question: since I'm not taking anything from you - how can this be a scam? :)
Regarding previewing with UVmapper: did you download the .obj files that I mention in Step 4?
The relevent paragraph is "Olila suggests the UVMapper demo and the Second Life avatar mesh files (the .obj ones). I explain how to use this later in this tutorial."
To use the UVMapper demo, you must download the .obj files.
Hello Seshat,I'm beginning my first step of learning to to make Clothes and Skins on my own.In Second Life,I'm known as Amra Lavender.I've followed the first step of downloading all the templates and other things I needed to start making things.But I'm somewhat confused with your 2 step bout Blending Chip's and Robin's Templates together.
The words "body section" in Parentheses of Saved as Blended...is that about the Body template or is that to be the part of the save file name?
"Open the other one"? Do you mean part of the Template I'm working on like Robin's Lower Body Template or the second Templates Set? Like I'm wanting to start Blending the Templates by starting with Robin's then Chip's.
[Body Section] refers to the body section you're working on. For example, if you're working on the upper body, it would be "Blended Upper Body Template.xcf".
And yes, "open the other" would be the other template set, for the corresponding body section. So if you're using Robin's upper body templates, you'd open Chip's upper body templates.
Once this has been posted, I'll go modify the instructions to be clearer. Thanks for letting me know exactly where I was confusing you.
Hi.. Loved the tutorial but im having problems getting started, i hv downloaded psd templates of chip and robin but i donno y i cannt open any of those in gimp. Yes ! i hv rechecked the file types , they are psd files . Plz reply
I'm going to have to ask you questions to help you, Anon.
Firstly, are you opening the Gimp, and then opening the file from inside the Gimp? That's the most reliable way to open a file that's not an xcf - the operating system of your computer may not know to use the Gimp to open anything else.
Secondly, what's happening - or not happening - when you try to open the file? Are you getting a dialog from the computer of some sort? If so, what does it say?
This was the best tutorial ever! It was easy to follow and you really went into details. I can't wait to start designing my own clothes now!!! Thanks so much!
Is there a way to design a face/body shape first (in SL Viewer or other software), then export it as a template to use in GIMP/Photoshop ?
It would be better to make a skin on my final shape, than to make one on the generic shape-templates & use the sliders in SL Viewer to adjust that to my face/body-shape.
thanks, i'm a noob
No, there isn't. However, the SL avatar shape is constructed of a lot of small polygons, and the pixels in the shape textures are painted onto specific polygons.
So the lip parts of the template will always be on your avatar's lips, no matter what your avatar shape is. Eyebrows, on the eyebrows. Nose on the nose, and so forth.
You won't need to adjust the sliders to get the pixels in the correct position.
Thanks, Seshat. But is there any way at all to start with a shape first, and then design a skin for it ? I keep hearing people say that a skin that looks good on one shape will look bad on a different shape.
Must you just design a skin, wear it, then modify your shape (in SL Viewer) ? Then if it looks bad, go back and guess how to change the skin.... trial and error until it looks right on your shape?
The interaction between skin and shape is largely a matter of shadow and highlight.
There's no way that I know of to make a template that's modified for the shape, no.
When I make anything for SL, however, it really is a process of 'create it, test it, modify it'. A skin is no different.
Build the shape you want. Make a rough skin-design, with marks where you think you'll want shading to be. (Collarbones, knuckles, six-pack, etc.)
Upload that rough skin design. Use a viewer with temporary uploads. Wear that skin.
Move the marks as necessary.
Trial the new draft. Rinse and repeat.
Once the marks are in the right place, paint shading in. Trial the shading. Adjust it. Rinse and repeat.
....
Some people take the avatar .obj files, upload them into a program like Maya and Blender, and make their skins directly onto the avatar base file. I don't know how to do that, but you can get tutorials for those programs.
where did you get your 3d prespective? Thanks for any info
If you read section 5a (the section around the 3D image), you'll find instructions on using the UVMapper software to preview clothing and provide the 3D perspective.
Post a Comment